Making your own custom DIY shelves is rewarding and practical for any home. It’s a great way to add storage and a personal touch. This guide will show you how to make your own shelves, from picking materials to installing them.
Choosing the right wood and learning finishing techniques is key. This article will give you the skills to make your own custom shelves. It’s perfect for beginners and experienced DIYers alike. You’ll learn everything you need to make great storage solutions for your home. Let’s start our DIY shelving journey!
DIY Projects: Crafting Custom Shelves at Home
Building your own DIY shelves is fun and saves money. It lets you make storage that fits your needs perfectly. Whether you’re experienced or new to DIY, making DIY shelf building can be rewarding and useful.
The Benefits of Homemade Shelves
Doing a DIY shelf building project has many perks. You can make shelves that fit your space just right. This means you get the most out of your space. Plus, you’ll feel proud of your work and can make your home look unique.
Essential Tools and Materials Needed
To start your DIY shelf building project, you’ll need some key woodworking tools for shelves. These include a saw, drill, sandpaper, glue, and screws or nails. Choose the right wood for your shelves, like pine, oak, or plywood. With the right tools and materials, you can make shelves that are perfect for your space.
Planning Your Shelving Project
Before starting your DIY shelving project, planning and measuring are key. Proper planning helps create shelves that look good and fit perfectly in your space. Begin by measuring the area for the shelves, noting the height, width, and depth. This ensures the shelves fit well and look great in your room.
Measuring and Designing Your Shelves
When measuring, be precise and think about the space needed for your items. Measure the height from the floor to the ceiling, considering any obstructions like windows or outlets. Use these measurements to pick the right shelf height and number of shelves. Also, measure the wall space to figure out the maximum shelf length.
With your measurements ready, start designing your shelves. Sketch different layouts to find the best fit for your space. Think about the shelf depth for the items you’ll store and include decorative or functional elements like brackets or dividers. Planning your shelves well ensures a smooth and successful DIY project.
Choosing the Right Wood for Your Shelves
Starting a DIY shelving project means picking the right wood is key. The best wood affects the shelves’ durability and look. It also makes building easier. You can choose from many wood types, like classic pine or elegant oak, for your shelves.
Softwoods like pine or cedar are popular for DIY projects. They’re easy to find, affordable, and simple to work with. This makes them perfect for beginners. Hardwoods, such as oak, maple, and cherry, give a luxurious look and are very durable. They’re a good choice if you want your shelves to last a long time.
Think about what you want your shelves to look like and how much weight they’ll hold. Also, consider your woodworking skills. Learning about different woods can help you pick the right one for your project. With the right wood, your DIY shelves will look great and last long.
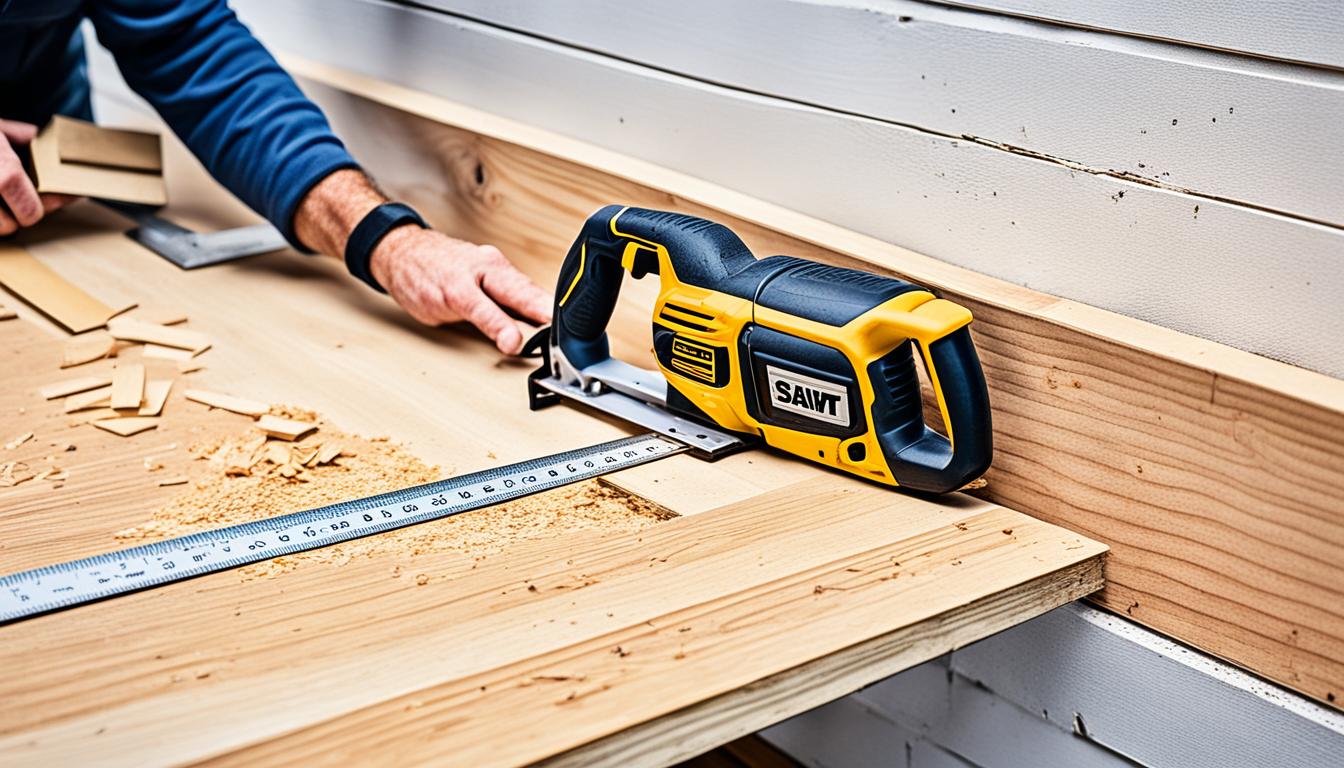
Cutting and Assembling the Shelf Pieces
Building your own shelves at home is a fun project. It starts with cutting and assembling the wood pieces. This is key for a successful shelf project, whether you’re experienced or new to woodworking.
Step-by-Step Guide to Cutting and Joining
Start by measuring and marking the wood for your shelves. Use a saw, either hand or electric, to cut the pieces to size. Make sure your cuts are clean and straight for a perfect fit.
After cutting, sand the edges to remove any rough spots. This makes the wood smooth and ready for assembly.
Now, it’s time to put your shelves together. Apply wood glue to the areas where the pieces will join. Use clamps to hold everything in place while it dries. Once dry, add extra support like corner brackets for extra strength.
Being patient and careful is important when building shelves. By following these steps, you’ll create strong, beautiful shelves that will last a long time.

Sanding and Finishing Your Shelves
Making beautiful, custom shelves at home is more than just putting them together. To get a smooth, professional look, you need to know how to sand and finish them right. With the right techniques, your homemade shelves can look amazing and improve any room’s look.
Techniques for a Smooth, Professional Finish
Sanding wood for shelves needs patience and careful attention. Begin with a coarse grit sandpaper, like 80-100 grit, to smooth out the surface and remove extra material. Move to finer grits, ending with 220-grit paper for a silky finish. This careful sanding is key for a sanding wood for shelves and a top-notch finish.
After sanding, it’s time for the final touches. Try different shelf finishing tips, like staining, painting, or sealing, to make your shelves stand out. Play with various techniques and finishes to achieve a quality DIY finish that fits your style and the room’s design.
Mounting and Installing Your New Shelves
Mounting and installing your new shelves is the final step in your DIY project. This guide will show you how to attach your shelves to the wall securely. This ensures they stay in place for a long time.
Start by finding the best spot for your shelves. Think about the wall’s strength, the space you have, and how easy it is to reach. Use a stud finder to find the wall studs. These are the best places to attach your shelves.
Then, measure the wall and mark where you’ll put the shelf brackets. Make sure the brackets are level and line up right to hold the shelf well. Drill holes into the studs and screw in the brackets securely.
After setting up the brackets, put the shelf on them. Carefully place the shelf on the brackets, adjusting if needed for a good fit. Use wood glue or other fasteners to tie the shelf to the brackets for extra stability.
Finally, check that the shelf is stable and make any last adjustments. Your new DIY shelves are now ready to show off your items and provide extra storage.
Creative Shelving Ideas and Inspiration
Making your own custom shelves lets you explore endless creative possibilities. Whether you want a rustic look or a modern feel, there are many DIY shelf ideas. You can turn your shelves into a true reflection of your style with unique designs and personal touches.
Unique Designs and Customization Tips
Don’t stick to traditional floating shelves or standard bookcases. Let your creativity flow with custom shelving projects. Use reclaimed wood, unique shapes, or repurposed items to make your shelves stand out. Try different finishes like sleek stains or bold paint colors to make your storage solutions unique.

Take your shelving to the next level with special features like built-in lighting or hidden compartments. Think outside the box and let your creativity show. Whether it’s a big wall project or a small corner display, the DIY shelf ideas are endless.
Troubleshooting Common DIY Shelving Problems
Building your own shelves can be a fun DIY project. But, even experts might face some challenges. Issues like uneven supports or warped wood can happen. With the right tips, you can fix these problems and make the shelves you dream of.
One big problem is making sure shelves are level and strong. Wrong measurements or off-wall mounts can cause shelves to wobble. To fix this, check your measurements twice, use a level, and add extra bracing or anchors if needed.
Warped or split wood is another common issue. This can be a big setback after cutting and assembling the shelves. You might need to replace the bad boards or use fillers to make the surface even before finishing.
Dealing with DIY shelf problems requires a step-by-step approach. First, figure out the main issue. Then, look for solutions and don’t hesitate to ask for help or use online resources. With patience and effort, you can fix even the toughest shelf problems and add a beautiful piece to your home.
Maintenance and Care for Long-Lasting Shelves
Keeping your homemade shelves in good shape is key to their longevity. By following simple steps, you can make sure they look and work great for many years.
Keeping Your Shelves in Top Condition
Regular cleaning is the first step in maintaining your shelves. Use a soft, damp cloth to wipe away dust or debris. For stubborn stains or dirt, try a mild wood cleaner or a mix of warm water and mild soap. Always dry the shelves well to avoid water damage.
It’s also vital to protect your shelves from the environment. Don’t let them sit in direct sunlight, as it can cause fading and discoloration. Keep them away from moisture or humidity to prevent the wood from warping or swelling.